Tuesday, September 27, 2011

Download free wallpaper win 7

Amazing windows 7 wallpaper download for free here:-- so enjoy..
click on wallpaper for download.....easy process

1) 100 Amazing windows 7 wallpaper:- Click here to download


Download themes for windows 7


Here with free download themes for Winodws 7.

Download centre:-

1) Androide windows 7 themes:- Download

2) Ferrari official windows themes:- Download

3) 7 up official windows 7 themes:- Download

4) 8 skin Pack windows 7 themes:- Download

5) Avtaar windows 7 themes :- Download

6) Beautiful Birds windows 7 themes :- Download


Windows 7 Editions types..

Following types of Windows 7 using now a days ....

Actually sixth types of windows seven but market only 3 types available now a days.

these are:-

1) Home (Premimum)Edition of windows 7:- Click here for Review
2) Professional edition of windows 7: - Click here for Review

3) Utimate edition of windows 7:- Click here for Review

Add user groups from command prompt..windows platform

On Windows computer we can add users to a group from command line too. We can use net localgroup command for this.
net localgroup group_name UserLoginName /add

For example to add a user to administrators group from command line we can run the below command. In the below example I have taken username as John.

net localgroup administrators John /add

Few more examples:

To add a domain user to local users group from command line:

net localgroup users domainname\username /add

This command should be run when the computer is connected to the network. Otherwise you will get the below error.

H:\>net localgroup users domain\user /add
System error 1789 has occurred.
The trust relationship between this workstation and the primary domain failed.

To add a domain user to local administrator group from command line:

net localgroup administrators domainname\username /add

To add a user to remote desktop users group:

net localgroup “Remote Desktop Users” UserLoginName /add

To add a user to debugger users group:

net localgroup “Debugger users” UserLoginName /add

To add a user to Power users group:

net localgroup “Power users” UserLoginName /add

This command works on all editions of Windows OS i.e Windows 2000, Windows XP, Windows Server 2003, Windows Vista and Windows 7. In Vista and Windows 7, even if you run the above command from administrator login you may still get access denied error like below.

C:\> net localgroup administrators techblogger /add
System error 5 has occurred.
Access is denied.

The solution for this is to run the command from elevated administrator account.

When you run the ‘net localgroup’ command from elevated command prompt:

C:\>net localgroup administrators techblogger /add
The command completed successfully.

To list the users belonging to a particular group we can run the below command.
net localgroup group_name

For example to list all the users belonging to administrators group we need to run the below command.

net localgroup administrators


Enjoyyyyyyyyyyyyyy...

Office 10 Installation in windows 7

How to install office 10 in windows 7 ......


Monday, September 26, 2011

Win 7 Antispyware 2012 infection and removal....

1) Remove Win 7 Antispyware 2012 in 4 Easy Steps.


(Video 1)

2) Remove Win7 Antispyware 2011


3) How to Remove Win 7 Security 2012 Virus for FREE

*. Remove Win 7 Security 2012 Fake (Virus Manual Removal Guide)

2) Remove Win 7 Security 2012 infection(Video 2)


Windows 7 tricks tricks video....

Windows 7 has many different tips tricks and shortcuts that the general public

are unaware of. This is a video unveiling a few of them. Enjoy


Master List Of Tips And Tricks On Windows 7 Video


IP Adress Change in WIN 7


Here with step by step details of how to change IP Address in Win 7.

1) Click on Start Button & go to control Pannel.Then Click on Network And Sharing centre


2) Click on Change adapter setting.


3) after change adapter setting click , several adapter icon will be displayed.
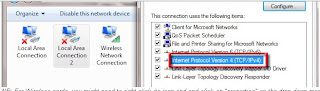
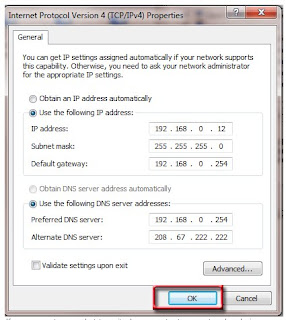
4)Double click on the icon of the adapter for which want to change IP address.


Select internet protocol ver. 4 for TCP/IPv4 Ip setting and click on Properties and enter valid IP parameters .

Click on OK for save setting......

Its Done.....................


Thursday, September 22, 2011

Join Domain in Windows 7


First see Prerequisite:-

- Need windows 7 Professional, Ultimate or enterprise edition.

- NIC (Network Interface Card)card is needed.

- Physically b connected to LAN.

- Valid IP address of network.

- All time connectivity with Domains server.

- DNS server properly configured.

- local administrative power.

- know domain controller name, user name also password.


So now see how to Join domain in windows 7 :-
1. Click on Start button , Right click on My Computer & got to system properties.


2. Click on Advance system setting , then click on Change setting.


3. Under Computer name, Domain & Workgroup setting, click on Change setting.

2. Click on Join Domain.


Click the Computer Name Tab nad then click " Change"
Under member of , click on Domain
Type the domain name, then click ok

Then type domain administrator username and password and click ok


Once sucessfully joine to Doamin, It will be prompted to restart computer..,
Now restart computer before the Changes take effects.


Enjoyyyyyy.............


Enable or disable the windows firewall in windows 7


Firewall is a Software and hardware base solution to filter incoming also outgoing traffic of system and Network.

So here step by step information with snap of how
to enable or disable windows Firewall .

1. Click on Start button go to Control Panel


2. Control Panel Click on System and Security button.


Windows 7


How To Install Windows 7 Step by Step......


1. Start system & go to Boot option menu by pressing Delete or F10 or F10 key (Its depend on syetm models which key going to boot menu)

2. Choose there DVD/CD drive & save this configuration , exit & Insert a boot able disk of Windows 7 professional .after boot up from disk this screen will be appear. _
(Figure 2)
3. After few minutes Starting Windows screen will be appear like this

(Figure 3)

4. Now Language , Date , Time & Religion selection windows come ,
Just select here time, date, zone also language .Then click Next..


(Figure 4)
5. Now click on Install button

(Figure 5)
6. Licences Agreement windows come, click on I accept terms & Conditions. Then click on next button.)
(Figure 6)

7. Now create a partition of hard drive as per requirement ,then select a c drive for installation of windows 7 , then click on Next button...


(Figure 7)


8. Windows Installation start........

(Figure 8)

9. Once installation of setup files done..windows automatic restarted..

(Figure 9)


10. After restart windows done the Finalize installation.

(Figure 10)

11. Lets pick a Username .Password if you want, Windows 7 is good like that.

(Figure 11)
12. After Windows is Installed, Put the valid product key.


(Figure 12)
13. Now Windows preparing desktop .


(Figure 13)
14 . Windows 7 desktop is ready to use

(Figure 13)